It’s 2:00 AM. Your phone is screaming a “Critical Low” alarm. You panic, chug a juice box, and check your finger stick… only to find your blood sugar is perfectly fine.
You just fell victim to a “Compression Low”—the curse of putting your sensor in the wrong spot.
Or maybe you’re here because you’ve ripped yet another $140 sensor off on a doorframe (the “Doorframe Effect” is a universal diabetic rite of passage).
Here is the cold truth: The “official” instructions for where to put Freestyle Libre sensor might not be the best place for your body. While Abbott strictly recommends the back of the upper arm, veteran users know that body chemistry, sleep habits, and muscle density often demand alternatives to standard continuous glucose monitoring placement.
We are going to break down the official guidelines, why they fail for some people, and the battle-tested “off-label” sites that users actually swear by.
Key Takeaways: At a Glance
The Official Line: Abbott only FDA-approves the back of the upper arm. Any other site is considered “off-label” and may void replacements if you admit it to customer support.
The “Doorframe” Fix: Moving the sensor slightly inward (toward the ribs) or to the chest can stop accidental knock-offs.
The Pain Fix: If the libre 3 hurts my arm, you likely hit muscle. Use the “Baby Flex” method (below) to find the fatty sweet spot.
Top Alternatives: The upper chest and thigh are the most popular user-tested alternatives for stability and accuracy.
The “Official” Guideline vs. Real-World Reality
If you open the manual for the Libre 2 or Libre 3, you see one diagram: the back of the upper arm.
Why? Is the arm magically more accurate? No. It simply means this is the only area Abbott paid millions of dollars to clinically test for FDA approval.
But “Clinical Approval” doesn’t always equal “Real Life Practicality.”
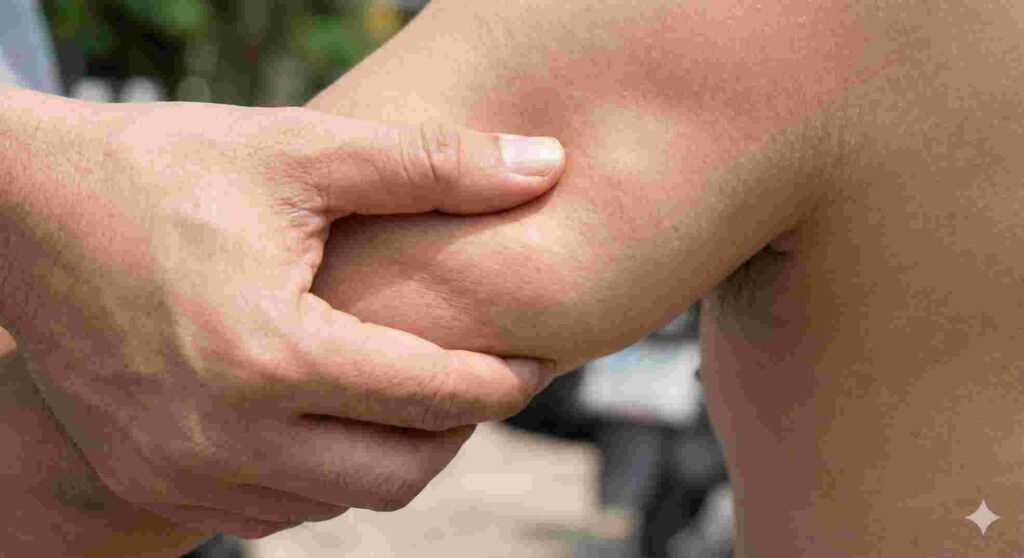
The Aha! Moment: The “Baby Flex” Technique
Most users complain that the libre 3 hurts my arm. This usually happens because they insert the filament directly into the tricep muscle rather than the interstitial fluid (fatty tissue) above it.
Don’t just guess. Use this technique before you apply:
Stand in front of a mirror.
Do a “Baby Flex” (tense your arm a bit, but don’t go full Hulk).
Look for the natural “valley” or shadow that appears between your tricep (back muscle) and deltoid (shoulder muscle).
That valley is your target. It is usually softer and has less nerve density than the muscle belly itself.
Why the Back of the Arm Sucks for Some
Before we look at alternative cgm sites, let’s look at why the standard location fails so many users.
| Problem | Why It Happens | The Consequence |
|---|---|---|
| Compression Lows | You sleep on the sensor, pushing fluid away from the filament. | False “Low Glucose” alarms at 3 AM. |
| The Doorframe Effect | The outer arm sticks out past your profile. | Sensor gets ripped off by doorways or bras. |
| Muscle Pain | Low body fat on the triceps. | Dull ache or stinging every time you move your arm. |
| Summer Sweat | Sweat pools under the armpit area. | Adhesive failure after 5-7 days. |
Top Alternative Placement Sites (User-Tested)
Disclaimer: The following locations are “off-label.” Abbott technical support may deny a replacement if you tell them you wore the sensor here. Proceed at your own risk.
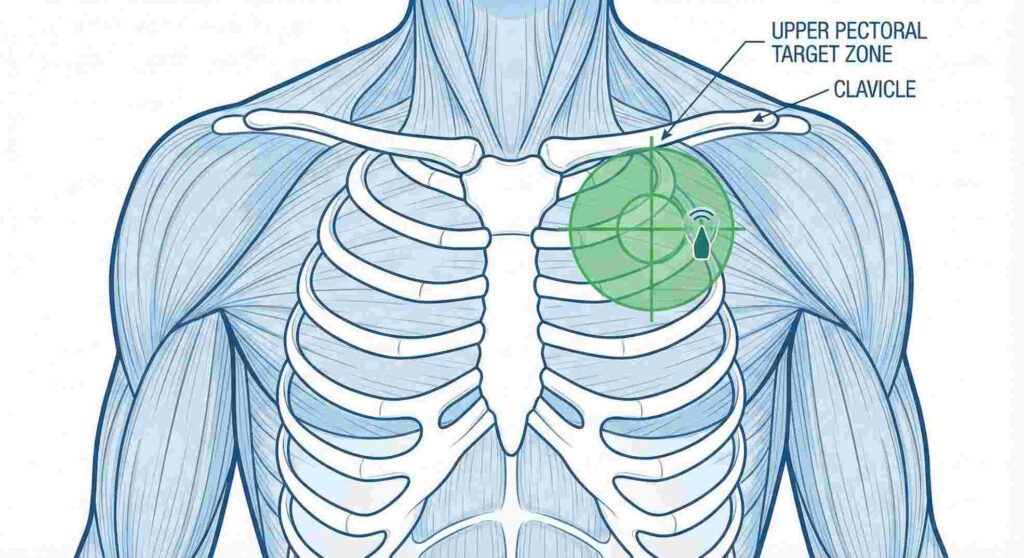
1. The Upper Chest (The “Pectoral” Sweet Spot)
For many, this is the holy grail of freestyle libre alternative sensor sites. It is flat, usually has enough tissue, and moves very little compared to an arm.
Where specifically: The flat area of the upper chest, about 3-4 finger widths below the collarbone.
Pros: Extremely stable; almost impossible to knock off on a doorframe; easy to scan discreetly.
Cons: Visible in low-cut shirts; potential scarring on a visible area. Women must avoid breast tissue and bra straps.
2. The Thigh (The “Cargo Pocket” Zone)
If you want to keep things private, the thigh is a top contender among freestyle libre placement sites.
Where specifically: The upper outer thigh, roughly where the pocket of a pair of cargo shorts would sit.
Pros: Totally hidden; you can use both hands freely without pulling skin; great for side sleepers (if you sleep on the opposite side).
Cons: Can be pulled by tight jeans; toilet visits require care when pulling pants down.
Accuracy Note: Some reports suggest thigh readings may lag slightly behind arm readings during rapid glucose changes (e.g., HIIT workouts), but are generally solid for steady states.
3. The Abdomen (Dexcom Style)
Dexcom users have used the stomach for years. Libre users can too, though results are mixed when looking for a freestyle libre alternative location.
Where specifically: at least 2 inches away from the belly button, avoiding waistbands.
Pros: Easy to apply; less painful for those with very skinny arms.
Cons: Lower Accuracy. The tissue here moves a lot when you sit, stand, or crunch, which can disrupt the filament connection. Many users report “jumpy” graphs here.
Comparing Accuracy & Comfort Across Sites
How do these sites actually stack up?
| Placement Site | Accuracy Rating | Comfort Level | Risk of Knock-off | Best For… |
|---|---|---|---|---|
| Back of Arm (Official) | ⭐⭐⭐⭐⭐ | ⭐⭐⭐ | High | Sticking to the warranty rules. |
| Upper Chest | ⭐⭐⭐⭐⭐ | ⭐⭐⭐⭐ | Low | Side sleepers & active folks. |
| Outer Thigh | ⭐⭐⭐⭐ | ⭐⭐⭐⭐ | Medium | Hiding the device. |
| Forearm | ⭐⭐ | ⭐ | Low | Not Recommended (High pain/nerve risk). |
| Abdomen | ⭐⭐⭐ | ⭐⭐⭐⭐ | Medium | Users with skinny arms. |
How to Stop the “Libre 3 Hurts My Arm” Issue
If you are committed to the arm but it hurts, you might be hitting a nerve.
The “Pinch Up” Method:
If you are lean, do not just smash the applicator down.
Use one hand to “pinch up” the skin and fat on the back of your arm.
Apply the sensor to that raised chunk of tissue.
Release immediately after the click. This ensures the filament enters fat, not the muscle fascia.
Troubleshooting: False Lows & Adhesive Failures
Even the best location for freestyle libre 3 won’t help if the sensor falls off or lies to you.
The “Compression Low” Fix
If your graph shows a sudden drop to “LO” followed by an immediate jump back to normal, you didn’t have a hypo. You rolled over.
Solution: If you sleep on your side, place the sensor on the inside of your arm (closer to the ribcage) rather than the direct back. Your torso shields it while you sleep.
The “It Fell Off” Fix
Exfoliate: Scrub the site with a rough towel in the shower to scour off dead skin.
De-Grease: Use an alcohol wipe. Wait for it to dry. Seriously, wait.
Stick: Apply Skin-Tac (liquid adhesive) before the sensor.
Cover: Use an over-patch (like Skin Grip or Not Just a Patch).
Frequently Asked Questions (FAQ)
1. Can I put my Freestyle Libre sensor on my chest? Yes, many users put it on the upper chest (pectoral area) with great success. People report high accuracy and fewer “compression lows” during sleep. Just know this is an “off-label” site and Abbott doesn’t officially approve it.
2. Why does my Freestyle Libre 3 hurt my arm? Pain usually means the sensor filament hit muscle tissue or a nerve. This happens a lot if you have lower body fat. Try moving the site slightly higher toward the shoulder or using the “pinch up” method to separate skin from muscle.
3. What is the most accurate alternative site for Libre sensors? Real-world usage suggests the upper chest is often just as accurate as the arm. The thigh is a close second, though it might lag a bit behind the arm during rapid blood sugar spikes or drops.
4. Will Abbott replace a sensor if I wore it on my leg? Technically, no. If you call support for a replacement, they ask where you wore it. If you say anything other than “back of the arm,” they can deny the claim because you didn’t follow instructions.
5. How do I stop knocking my sensor off on doorframes? Move the sensor placement further “inward” on your arm. Instead of placing it on the absolute outer edge of the tricep, aim for the inner curve facing your ribs. Your body shields the sensor when you walk through doors.
Conclusion
Finding where to put Freestyle Libre sensor is often a game of trial and error. While the back of the arm is the “gold standard” for warranty support, it isn’t the only option for accurate glucose management.
If you are dealing with pain, knock-offs, or sleep disruptions, it might be time to test the “cargo pocket” thigh method or the stable freestyle libre chest placement. Just remember: technology serves you, not the other way around.
Ready to upgrade your monitoring experience? Make sure you have the latest, most accurate sensors delivered to your door.


Can I really put the Freestyle Libre on my chest?
Yes, you absolutely can, and for many users, it is actually more accurate than the arm because the tissue there is stable and doesn’t move around much. Just remember that this is technically “off-label,” so Abbott doesn’t officially support it.
Why does my arm hurt so bad after applying the sensor?
You most likely hit the muscle. The filament is meant to sit in the fatty layer just under the skin, but if you have lean arms, it can go too deep and poke the muscle tissue. Next time, try pinching the skin up to create a cushion before you press the applicator.
Will Abbott replace my sensor if I admit I wore it on my leg?
No. If you call customer support and tell them the sensor fell off your thigh or chest, they will deny the replacement because you didn’t follow the instructions. If you want a replacement, you need to have worn it on the back of your arm.No. If you call customer support and tell them the sensor fell off your thigh or chest, they will deny the replacement because you didn’t follow the instructions. If you want a replacement, you need to have worn it on the back of your arm.
Is the thigh as accurate as the arm?
It is very close, but it can be a little slower. Because circulation is different in your legs, the sensor might lag behind your actual blood sugar by a few extra minutes compared to the arm. It works great for stable readings, but might be a bit slow during a rapid spike or drop.
How do I stop ripping the sensor off on doorframes?
Stop putting it on the outside of your arm. Instead of placing it where it sticks out, rotate the placement slightly inward so it sits between your bicep and tricep, facing your ribcage. That way, your body shields the sensor when you walk through a doorway.


Write a comment
Your email address will not be published. All fields are required