Living with diabetes is a full-time job where you don’t get weekends off. You rely heavily on your gear to keep you safe and keep things running smoothly. If you are using a Continuous Glucose Monitor (CGM), you know that your device is basically your lifeline. That is why getting your dexcom g7 sensor replacement routine down to a science is so important. It isn’t just about swapping out a piece of plastic every week and a half; it’s about making sure you don’t have any gaps in your data so you can go about your day without worrying.
The G7 has totally changed the game compared to older models, but it still comes with its own set of quirks. Whether you are new to this or you’ve been wearing CGMs for years, you probably have questions about how to keep it on longer, when to swap it, and what to do if it fails. In this guide, we are going to break down the entire dexcom g7 sensor replacement process, looking at the real-world tips and tricks that the instruction manuals usually leave out.
Why the G7 is Different (And Easier)
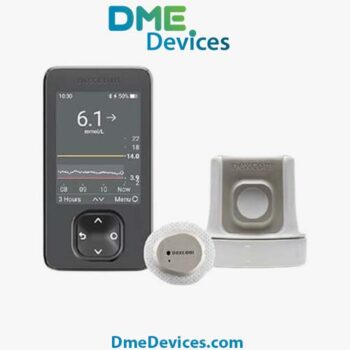
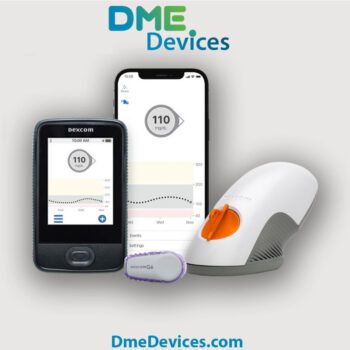
If you used the G6, you remember the hassle. You had to save the transmitter, snap it into the new sensor, and hope you didn’t lose the grey piece in the process. The biggest upgrade with the G7 is that it’s all-in-one. The transmitter and sensor are built together. So, when it is time for a dexcom g7 sensor replacement, you are tossing the whole thing and starting fresh.
This might sound like a small change, but it makes a huge difference in your daily life. It means fewer steps, less trash to manage separately, and a much faster setup. Plus, the device itself is about 60% smaller. You barely feel it on your arm. But the real winner here is the warm-up time.
Old sensors made you wait two hours before they started giving you numbers. That is two hours of flying blind. The G7 cuts that down to 30 minutes. That means your dexcom g7 sensor replacement downtime is barely long enough to watch a sitcom episode.
Quick Look: G6 vs. G7
Here is a quick breakdown of why this upgrade matters for your routine.
| Feature | Old Way (G6) | New Way (G7) |
|---|---|---|
| Warm-up Wait | 2 Hours | 30 Minutes |
| Grace Period | None | 12 Hours |
| Setup | Two pieces | All-in-one |
| Wear Time | 10 Days | 10 Days |
The 12-Hour “Grace Period” Explained
This is probably the coolest feature that people don’t talk about enough. On the old devices, when your 10 days were up, the sensor just died. Hard stop. If that happened at 2 AM, you were waking up to fix it or sleeping without data.
Now, when you hit the 10-day mark, the system gives you an extra 12 hours. It keeps working perfectly. This grace period totally changes how you plan your dexcom g7 sensor replacement. You don’t have to stop what you are doing. You can wait until you are home, showered, or just ready to deal with it. It basically gives you 10.5 days of wear, which is a massive help for anyone with a busy schedule.
Step-by-Step: Nailing Your Dexcom G7 Sensor Replacement
The instructions in the box are fine, but they are a bit clinical. Here is how real people actually do a dexcom g7 sensor replacement to make sure it sticks and works.
Prep Work is Everything
Don’t skip this. Most sensors fall off because the skin wasn’t ready.
Scrub, Don’t Just Wipe: Use an alcohol pad, but really get in there. You need to scrub the site (usually the back of the arm) to get rid of oil and dead skin. If you just gently wipe it, the adhesive won’t grab onto the skin, it will grab onto the dirt sitting on top of your skin.
Let it Dry: This is the mistake everyone makes. Wait until the alcohol is 100% dry. If you slap the sensor on wet skin, it’s going to peel off in two days, and you’ll be doing an early dexcom g7 sensor replacement.
Sticking It On
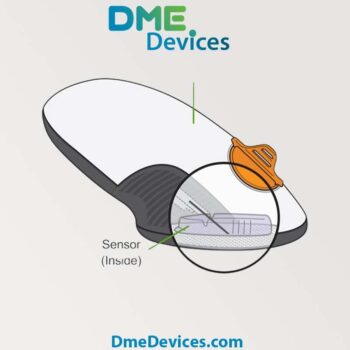
Unscrew the Cap: Pretty standard. Don’t touch the sticky part.
Press Down: Put the applicator on your arm and push properly. You want that adhesive to really touch the skin before you fire the needle.
Click: Push the button. It happens fast.
The Magic Rub: Once it is on, take your finger and rub around the white adhesive patch three or four times. The glue is heat-activated. The friction from rubbing it helps it set. If you skip this, don’t be surprised if it peels up after a shower.
The Overpatch
There is an extra sticker in the box called an overpatch. Use it. Unless you are allergic to the glue, this thing is your best friend. It covers the edges of the sensor tape and stops it from catching on your t-shirt or door frames. Putting this on right after your dexcom g7 sensor replacement is the best way to ensure it actually lasts the full 10 days.
Dealing with Failures: The Dexcom G7 Sensor Failure Replacement
Look, technology breaks. It happens. Sometimes you do everything right, and the sensor just quits on day three. If this happens, you don’t have to eat the cost. You can usually get a dexcom g7 sensor failure replacement for free.
When to Call It Quits
If you see a “Sensor Failed” message, that’s it. The sensor is dead. You need to pull it off and start over. But before you throw it in the trash, write down the Lot Number from the box or the app. You’ll need that to claim your dexcom g7 replacement sensor from support.
However, if you see “Brief Sensor Issue,” don’t rip it off yet. This usually just means the Bluetooth signal is messy or your body is a bit dehydrated. Drink some water, keep your phone close, and give it three hours. It usually fixes itself. If you panic and do a dexcom g7 sensor replacement immediately, you might be wasting a perfectly good sensor.
| Error Message | Likely Cause | Action Needed |
|---|---|---|
| Brief Sensor Issue | Signal interference or body fluid changes. | Wait 3 hours before replacing. |
| Sensor Failed | Electronics malfunction or filament breakage. | Replace immediately. Request support. |
| Signal Loss | Phone is too far away. | Move phone closer (within 20ft). |
Keeping It Stuck: Adhesion Hacks
If you are active, sweaty, or live somewhere humid, the standard glue might not be enough. You don’t want to be constantly searching for dexcom g7 replace sensor tips because yours fell off at the gym.
Get Some Skin-Tac: This is a sticky wipe you use before you put the sensor on. It makes your skin tacky, like flypaper. It creates a super strong bond. Just make sure you leave a tiny dry spot in the middle for the needle so you aren’t inserting glue into your arm.
Removal Matters Too: When the 10 days are up and you are ready for your next dexcom g7 sensor replacement, be nice to your skin. Don’t rip it off like a band-aid. That irritates the skin and makes it harder for the next one to stick. Use some baby oil or adhesive remover (like Unisolve). Soak the patch, wait a minute, and it will slide right off. Your skin will thank you.
Accuracy: What to Expect After Replacing
A lot of people freak out because their numbers look weird right after a dexcom g7 sensor replacement. This is actually normal. When you insert that tiny wire under your skin, your body reacts. It’s a foreign object, so there is a little bit of inflammation.
Because of this, the readings might be a little jumpy for the first 12 to 24 hours. It doesn’t mean the sensor is broken. Give it time to settle in. If you really think it’s wrong, verify it with a fingerstick. But try not to calibrate it during the first day unless it is way off. Calibrating while the sensor is still “waking up” can sometimes confuse the algorithm and make it worse.
| Metric | What it Means | Expectation |
|---|---|---|
| MARD Score | Accuracy rating (8.2%) | Lower is better. |
| Day 1 Accuracy | Settling in phase | Expect minor jumps. |
| Day 2-10 Accuracy | Stable phase | Highly reliable data. |
The 10-Day Cycle: A Reality Check
To really master the dexcom g7 sensor replacement routine, it helps to know what the lifecycle of a sensor actually feels like.
Day 1: You do your dexcom g7 sensor replacement. The first few hours might show readings that are slightly lower than your fingerstick. This is the “trauma response” of the skin.
Day 2-9: The “Sweet Spot.” The sensor is settled, the adhesive is holding strong, and the data is usually spot-on. You rarely have to think about it.
Day 10: The countdown begins. You get alerts that the session is ending. This is when you should check your supplies. Do you have a dexcom g7 replacement sensor ready? If not, order one.
The Grace Period (Day 10.5): The sensor technically expires, but you have that 12-hour buffer. Use this time to hydrate and prep your skin for the next dexcom g7 sensor replacement.
Managing Costs and Supply
Let’s talk money. These things aren’t cheap. You are going to need a dexcom g7 sensor replacement roughly three times a month. That means you need a steady supply.
Nothing is worse than a sensor failing on a Friday night and realizing you don’t have a backup. Always keep a buffer. When you open your last box, order more immediately. Don’t wait.
If you are struggling with insurance approvals, check if your plan covers it under “Pharmacy” benefits instead of “Medical” benefits. Sometimes that switch makes the copay cheaper and the paperwork faster.
Also, keep an eye on your expiration dates. The sensors do expire. Using an expired one is a gamble—it might work, or it might fail on day two, forcing you to do an unexpected dexcom g7 sensor replacement and waste money.
Troubleshooting Common Annoyances
Here are a few specific situations you might run into and how to handle them without losing your mind.
Bleeding: You insert the sensor and see blood. Don’t panic. You poked the skin, so a little blood is possible. If it’s just a drop, wipe it up and ignore it. It won’t hurt the reading. If it’s bleeding a lot and won’t stop, or if the sensor fills with blood, that’s a problem. In that case, you need to remove it and replace dexcom g7 sensor on a different spot.
Pain: You shouldn’t feel the sensor once it is on. If you feel a sharp pinching or throbbing that doesn’t go away after 10 minutes, you might have hit a nerve or a muscle. Don’t try to “tough it out.” It’s not worth it. Take it out and put a new one on. This is a valid reason for a dexcom g7 sensor failure replacement request.
Compression Lows: This happens at night. You roll over onto your arm, pressing the sensor into the mattress. Suddenly, your alarm goes off screaming that you are low. If you feel fine, check your position. Relieve the pressure on the arm and wait 15 minutes. It is likely a false alarm caused by the lack of fluid around the sensor wire.
Final Thoughts on Your Routine
At the end of the day, the G7 is a tool to help you live better. It shouldn’t be a source of stress. By mastering the dexcom g7 sensor replacement routine, you take control. You stop worrying about whether it will fall off or if you have enough supplies, and you start focusing on the rest of your life.
Remember to rotate your sites—don’t keep poking the same spot on your arm or you’ll build up scar tissue. Use the grace period to your advantage. And never be afraid to ask for a replacement if the tech fails you. You paid for a working device, and you deserve one.
If you are running low on supplies or looking to start with the G7, make sure you are buying from a reliable source. You can Buy Dexcom G7 Sensor online to keep your stock full. Staying prepared is the best way to make sure diabetes doesn’t slow you down.


Write a comment
Your email address will not be published. All fields are required